Japan Shader
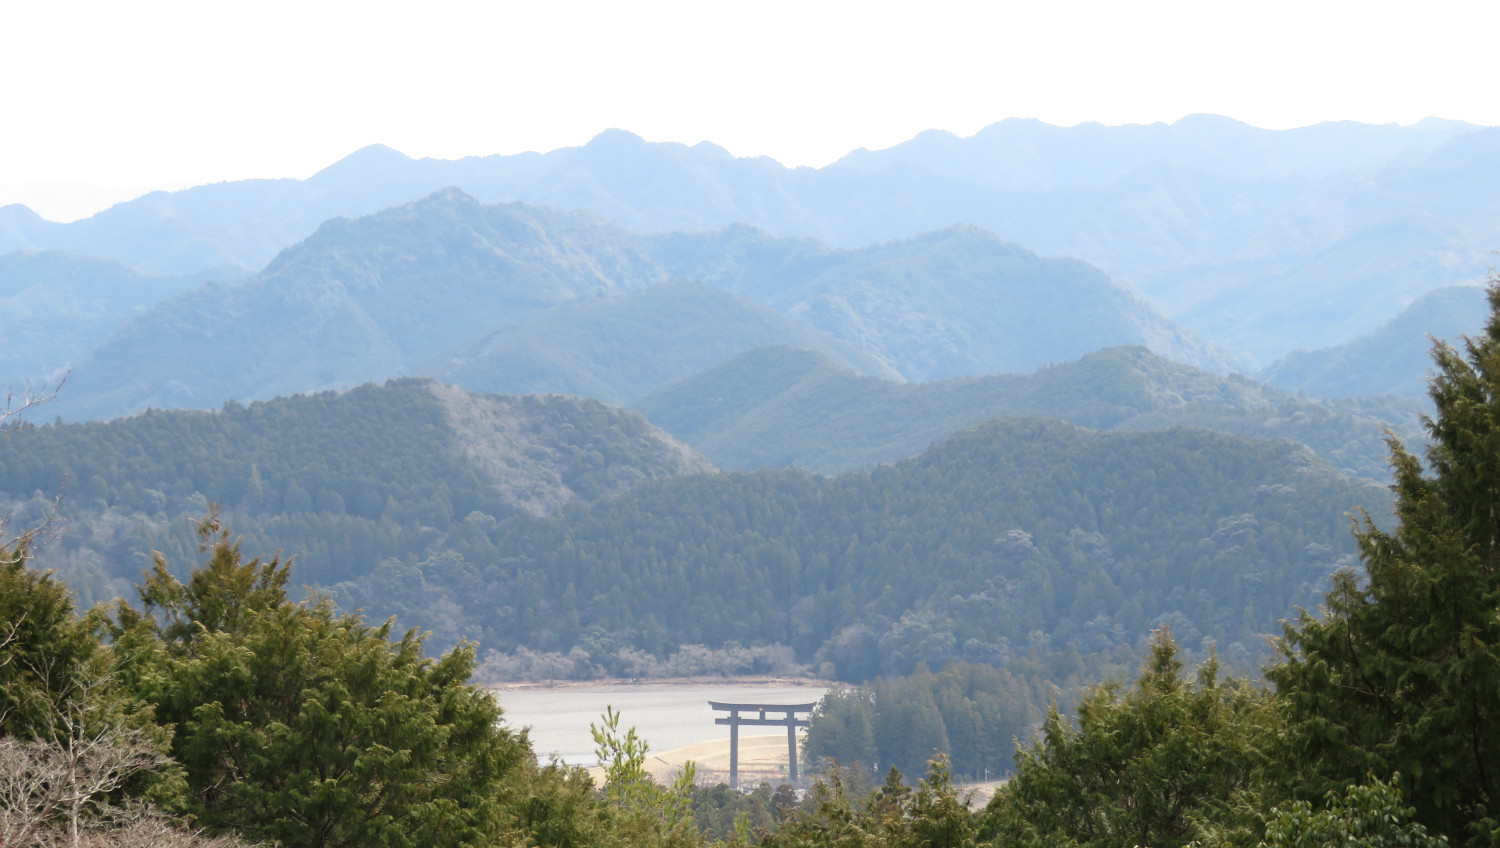
Mountains fading out toward the horizon. This is what we’re looking to re-create in a shader. Photo taken from Oyunohara View Point, Wakayama Prefecture
The mountains in traditional japanese art prints, ridge behind ridge, each one paler than the last until they finally fade into the sky, always struck me as a stylistic choice. A way of flattening distance onto the canvas. Then I walked the Kumano Kodo, on the Kii Peninsula south of Osaka, and found out that these paintings are much closer to reality than I thought they were. Near ridges dark green. The next one blue-grey. Four or five more behind that, each fainter, the last barely separable from the sky. Dense folded ranges, a lot of humidity, and atmospheric scattering does the rest.
Having worked with elevation models and ray marching before, I figured it would be an interesting challenge to try and recreate this prorammatically. Not a static image, but an interactive applet where you can pick a point on the map and have the mountain ranges laid out before you, in the traditional Japanese art style. So before we dive into how this is done, enjoy some dynamically rendered Japanese mountains, drawn live by your GPU:
The shader
The core of this app is the WebGL shader. For each pixel on the screen, it marches along the corresponding ray in 3d space and checks whether the ray intersects with the terrain at any point. The ray marching loop is quite simple:
for(; t <= 15.e4; t *= 1.05) {
  vec3 check = x0 + t * dx;
  alpha *= 0.992;
  float h = height(check.xy);
  if(h > check.z || h > 5000.) {
    break;
  }
}
At each step it samples the digital elevation model (DEM) texture. If the sampled terrain height is higher than the current ray height, the ray has hit something. If it does not hit anything within about 150 km, we stop marching and treat this pixel as sky.
Now there is no actual lighting simulation or anything done in the shader. Instead, the alpha variable starts at 1.0 and decays as the ray flies through space. The later the ray hits the terrain, the less alpha is left. For near terrain, we colour the pixel dark green, while farther terrain shifts toward blue, and long unobstructed rays fade toward a pale grey sky:
if(alpha < 0.5) {
  fragColor = mix(sky, blue, alpha * 2.0);
} else {
  fragColor = mix(blue, green, alpha * 2.0 - 1.0);
}
That is why the output feels more like a painting than a shaded relief map. The visible shapes are controlled by real topography, but the color ramp is chosen to emphasize distance, haze, and silhouettes.
Getting Elevation Data
Copernicus provides global elevation models at multiple resolutions. As the browser will have to load all of Japan into RAM, the processed DEM will have to be quite low-res, so I used the coarse 90m product as a good starting point. After downloading 71 DEM tiles from the Copernicus S3 bucket, this data now needs to be reprojected from a lat/lon grid (EPSG:4326) to something more suited for building something resembling 3d space. Considering our rough radius requirement of 150km, we can get away with using Mercator (EPSG:3857) here, ignoring the fact that Earth is a sphere. Also, using Mercator makes the calculations between points on the map and the pixel space of the DEM much easier. The reprojection happens in 2 steps:
- Building a VRT from the elevation tiles
- Warping the VRT to Web Mercator and subsetting to the bounds of Japan
gdalbuildvrt dem.vrt dem_tiles/*

gdal_translate \
  -projwin 14411296.0 5015741.0 15844896.0 3582141.0 \
  -tr 700 700 \
  -co COMPRESS=DEFLATE \
  dem.vrt dem.tif
Bounds and resolution are chosen in such a way that the resulting DEM texture will be 2048×2048 pixels in size. Finally, PIL converts the TIF image into a 16-bit grayscale PNG, making it easy to serve and load into WebGL.
import rasterio as rio
from PIL import Image
with rio.('dem.tif') as raster:
# Scale by 10.0 to keep more vertical accuracy
data = raster.(1) * 10.0
img = Image.(.(.))
img.('dem.png')This is the practical trick that makes the whole applet lightweight. All the geospatial work happens offline. The web app only needs this one 2048 by 2048 elevation texture and a WebGL fragment shader.
Tradeoffs
There are plenty of inaccuracies. Web Mercator distorts scale, the elevation texture is coarse, the ray marching uses fixed exponential steps, the camera sits just above the DEM surface, and the atmosphere is just a hand-tuned color fade. There is no lighting model, no shadows, no clouds, and no curvature correction.
But for this purpose those are acceptable compromises. The goal is not to answer “what exactly would I see from this point?” The goal is to make a fast, explorable sketch of how Japan’s terrain stacks up visually: ridge after ridge, each one a little paler than the last.